
I remember the first time I peered into my kombucha brewing jar and saw something white and fuzzy growing on top. My heart sank. Had I just wasted a week of careful preparation? Was this the dreaded mold I had read about in every kombucha warning post?
After brewing hundreds of batches over the past three years, I can tell you this: most of what new brewers think is mold turns out to be perfectly normal SCOBY formation. Kombucha mold is actually rare when you follow basic brewing practices. The problem is that a healthy SCOBY can look strange, lumpy, and alien – especially when you are new to fermentation.
This guide exists because I have seen too many new brewers throw away perfectly good batches. I will show you exactly what kombucha mold looks like compared to a healthy SCOBY, using clear visual markers you can check in seconds. You will learn the specific characteristics that separate contamination from normal brewing, plus the temperature and pH thresholds that keep your brew safe.
Table of Contents
What Does Mold on Kombucha Look Like?
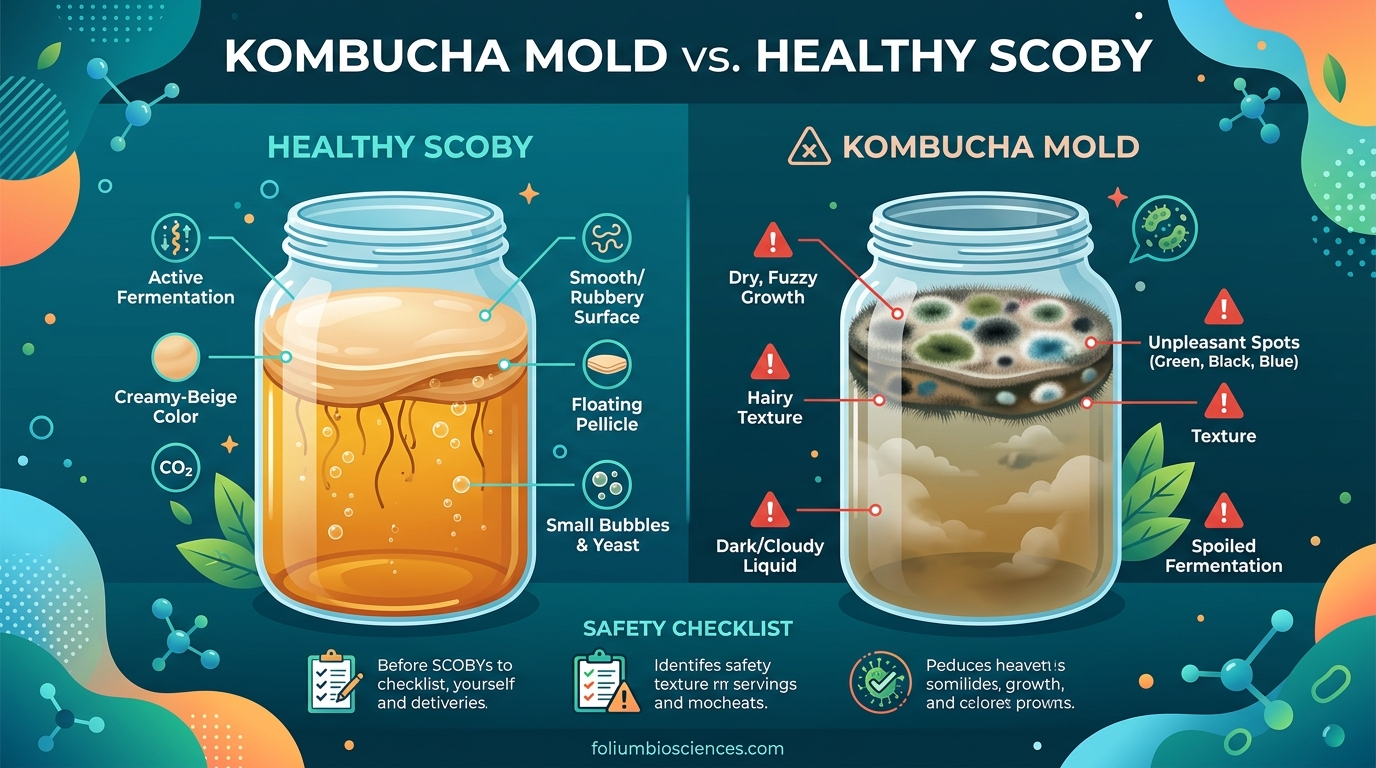
Kombucha mold is an overgrowth of bad bacteria or fungus, similar to the mold you might find on old bread or forgotten fruit. It is not subtle. When mold appears on your SCOBY, it shows distinct visual characteristics that differentiate it from healthy fermentation.
The Fuzzy Texture Test: Real mold always looks fuzzy, hairy, or dusty. This is the single most reliable identifier. Run your finger along the outside of the jar (do not open it). If the growth looks like it has tiny filaments or a velvety texture, that is mold. A healthy SCOBY will look smooth, gelatinous, or rubbery – never fuzzy.
The Color Code: Mold on kombucha typically appears as blue, green, black, or white circular spots. These spots often start small and expand outward in a circular pattern. White mold can be particularly tricky because it looks similar to new SCOBY formation, but the texture gives it away.
Dry Surface Appearance: Mold tends to look dry, powdery, or raised above the surface of the liquid. It does not integrate with the SCOBY layer. Instead, it sits on top like dust on a table.
Where It Grows: Mold grows on the surface where oxygen is available. It rarely appears submerged in the liquid. If you see something suspicious at the bottom of your jar, it is almost certainly not mold.
Common Mold Colors and What They Mean:
- Blue or Green: These are the most common mold colors on kombucha. They typically indicate Penicillium or Aspergillus species. This is unequivocally mold.
- Black or Dark Brown: Often indicates more mature mold growth. Also contamination that requires disposal.
- White and Fuzzy: Can be mistaken for new SCOBY formation, but the fuzzy texture distinguishes it from healthy cellulose growth.
- Pink or Red: Rare but serious. Indicates bacterial contamination beyond normal fermentation.
What Does a Healthy SCOBY Look Like?
A healthy SCOBY (Symbiotic Culture Of Bacteria and Yeast) is a living, changing organism. It will not look the same from batch to batch, and that variability confuses new brewers. Understanding the normal range of appearances will save you from unnecessary worry.
The Classic Pellicle: Most people picture a smooth, creamy-white disk floating on top of the tea. This is indeed what many healthy SCOBYs look like. The surface should appear gelatinous, shiny, or slightly wet. It may have a consistent off-white or tan color.
Lumpy and Uneven Is Normal: Your SCOBY does not need to be a perfect circle. It can form with bubbles trapped underneath, creating lumps and valleys. The edges might be thin and ragged. These imperfections are signs of active fermentation, not contamination.
Brown Strings and Yeast Colonies: Those brown, stringy bits hanging from your SCOBY are yeast strands. They are completely normal and actually indicate healthy yeast activity. You might also see brown clumps or sediment at the bottom of the jar. This is spent yeast and bacteria – a natural byproduct of fermentation.
SCOBY Sinking Is Not Death: One of the most common worries I see in forums is when a SCOBY sinks to the bottom. This is completely normal. The SCOBY pellicle is just a byproduct of fermentation; it does not need to float to work. A new SCOBY will often form on the surface anyway, regardless of where the original one sits.
Color Variations: Healthy SCOBYs range from almost white to tan, beige, or even light brown. The color depends on your tea type, brewing time, and the age of your culture. Darker teas like black or oolong produce darker SCOBYs. Green tea produces lighter ones.
New SCOBY Formation Confusion: During the first few days of brewing, you might see small white spots or patches forming on the surface. These are the beginnings of a new SCOBY pellicle. Over time, these patches connect and thicken into a solid layer. This process can look suspiciously like mold, but remember: new SCOBY is smooth and wet, never fuzzy.
Kombucha Mold vs Healthy SCOBY: Side-by-Side Comparison
When you are standing in front of your brewing jar trying to decide if that white patch is friend or foe, use this comparison to make the call. I have distilled years of brewing experience and forum discussions into these clear differentiators.
Visual Characteristics Chart
Texture: Mold presents as fuzzy, hairy, dusty, or powdery. It looks like it has tiny filaments when examined closely. Healthy SCOBY appears smooth, gelatinous, wet, shiny, or rubbery. It may have an uneven surface but never a fuzzy one.
Color: Mold shows blue, green, black, white (with fuzz), or pink/red colors. These colors appear as distinct spots or circular patterns. Healthy SCOBY displays off-white, cream, tan, or light brown uniform coloring. Darker brown areas are typically yeast, not mold.
Integration: Mold sits on top of the liquid or SCOBY surface. It does not merge with the pellicle. You could theoretically peel it off. Healthy SCOBY integrates with the liquid surface. It forms a continuous layer that becomes part of the brew.
Moisture: Mold appears dry, even crispy. It looks like it would flake off if touched. Healthy SCOBY looks moist, wet, or slimy. It should never appear dried out.
The Decision Tree: Wait or Throw?
Throw it out immediately if:
- You see any blue, green, or black spots on the surface
- The growth is fuzzy, hairy, or dusty in texture
- The spot appears dry and sits on top of the SCOBY
- You see pink, red, or orange discoloration anywhere
- Mold appears in multiple distinct circular spots
Wait and observe if:
- The white patches are smooth and look wet or shiny
- The SCOBY is sinking (this is normal behavior)
- You see brown strings or sediment (yeast activity)
- The color is uniformly tan, cream, or brown
- The texture is gelatinous or rubbery, not fuzzy
Give it 3-5 more days if unsure: New SCOBY formation can look odd in early stages. If after several days the patch has thickened, connected to surrounding growth, and maintains a smooth texture, it was healthy all along.
Kahm Yeast vs Mold: The Confusing In-Between
Kahm yeast is the trickiest thing you will encounter as a new brewer. It is not mold, but it is not exactly desirable either. Understanding Kahm yeast will save you from throwing away salvageable batches.
What Kahm Yeast Looks Like: Kahm yeast appears as a thin, white, wrinkled film across the surface. It looks like a very thin layer of tissue paper or skim milk skin. Unlike mold, it is not fuzzy. Unlike healthy SCOBY, it does not thicken into a rubbery pellicle.
Key Differentiator: The texture is the giveaway. Kahm yeast is smooth and flat. It may have a wrinkled or cracked appearance, but never the hair-like filaments of mold. It also covers the entire surface uniformly rather than appearing as isolated spots.
Is Kahm Yeast Dangerous? Kahm yeast is generally considered safe to consume, though it can affect flavor. Some brewers choose to remove it and continue brewing. Others prefer to start fresh because Kahm yeast can open the door to actual mold if conditions remain unfavorable.
What Causes Kahm Yeast: It typically appears when fermentation temperatures are too warm, when the pH is not acidic enough, or when there is insufficient starter tea. If you see Kahm yeast, check your brewing environment and ratios.
Why Does Kombucha Get Mold?
Mold does not appear randomly. It requires specific conditions to gain a foothold in your brew. Understanding these conditions helps you prevent contamination before it starts.
Low Acidity: Kombucha is naturally resistant to mold because of its acidic environment. The pH should drop to between 2.5 and 3.5 during fermentation. If the pH stays too high (above 4.0), mold spores can survive and multiply.
Insufficient Starter Tea: Starter tea is already-acidic kombucha from a previous batch. It jumpstarts fermentation and creates that protective acidic environment. Using too little starter tea leaves your brew vulnerable during the first few days when pH is still high.
Temperature Danger Zones: Temperature is the most controllable factor in mold prevention. When brewing kombucha stays below 65 degrees Fahrenheit (18 degrees Celsius), fermentation slows significantly. The SCOBY becomes less active, and pH drops too slowly to prevent mold colonization. The sweet spot is 75-85 degrees Fahrenheit (24-29 degrees Celsius).
Contamination Sources: Mold spores are everywhere in the environment. Using unclean equipment, brewing near garbage cans or compost bins, or leaving the jar uncovered during maintenance can introduce spores. Even opening the jar frequently to check progress gives mold opportunities to enter.
Weak SCOBY: An old, exhausted, or stressed SCOBY cannot ferment effectively. If your SCOBY has been sitting in vinegar for months or was exposed to temperature extremes, it may lack the vigor to establish a protective environment quickly.
How to Prevent Mold in Kombucha
Prevention is straightforward once you understand the science. I have brewed for three years without a single mold contamination by following these principles.
1. Use Enough Starter Tea: The standard ratio is 1 cup of starter tea per gallon of sweet tea. In summer, I use slightly more. In winter, I use slightly more and ensure my brewing area stays warm. The starter tea drops the pH immediately, creating an environment where mold cannot thrive.
2. Control Your Temperature: Keep your brewing vessel between 75-85 degrees Fahrenheit (24-29 degrees Celsius). Below 70 degrees, fermentation slows and mold risk increases. Above 85 degrees, you risk Kahm yeast and overly sour kombucha. I use a heat mat in winter and move my brew to a cooler spot in summer heat waves.
3. Cover Properly: Use a tight-weave cloth cover secured with a rubber band. This keeps fruit flies and dust out while allowing gas exchange. Coffee filters work well. Cheesecloth can be too loose if the weave is wide. Never use a solid lid during first fermentation.
4. Sanitize Everything: Wash your hands, utensils, and brewing vessel with hot water and distilled white vinegar before each batch. Avoid soap residue, which can harm your SCOBY. I keep a spray bottle of vinegar handy for quick sanitizing.
5. Location Matters: Place your brewing jar away from garbage bins, compost containers, fruit bowls, and direct sunlight. These areas harbor mold spores and temperature fluctuations. A stable spot in your kitchen or pantry works best.
6. Check pH If Unsure: pH test strips are inexpensive insurance. Your brew should start at or below pH 4.5 and drop to 2.5-3.5 by the end of fermentation. If pH stays above 4.0 for more than three days, your batch is at risk.
7. Do Not Disturb: Resist the urge to open the jar and poke your SCOBY daily. Every time you open the cover, you expose the surface to airborne contaminants. Check visually through the glass, but keep the cover on for the first week.
What To Do If You Find Mold on Your SCOBY
Finding mold can feel devastating, especially if it is your first batch. Here is exactly what to do – and what not to do – if you confirm mold contamination.
Do Not Try to Save It: Once mold appears on the surface, the entire batch is compromised. Mold sends microscopic roots (hyphae) deep into the liquid. You cannot scoop off the top layer and save the rest. This includes the SCOBY itself – any pellicle that has touched mold should be discarded.
Safe Disposal Steps:
- Put on gloves if you have them
- Pour the entire contents of the jar into the trash or compost bin
- Discard the SCOBY – do not attempt to rinse or reuse it
- Wash the jar thoroughly with hot water and vinegar
- Sterilize with boiling water or run through a hot dishwasher cycle
Starting Fresh: You will need a new SCOBY and starter tea from a trusted source. Do not use anything from the contaminated batch. If you have a backup SCOBY hotel, that is your best option. Otherwise, obtain a fresh culture from a reputable supplier or friend.
Assess What Went Wrong: Before brewing again, identify the likely cause. Was the temperature too cold? Did you use enough starter tea? Was your equipment properly sanitized? Fix the underlying issue to prevent recurrence.
Common Mistakes New Brewers Make
After participating in online brewing communities and making my own share of mistakes, I have identified patterns that trip up beginners. Recognizing these will save you from unnecessary worry and wasted batches.
Mistake 1: Panicking About SCOBY Position: New brewers often throw away batches because the SCOBY sank, floated sideways, or broke into pieces. None of these indicate problems. The SCOBY pellicle is just a byproduct. As long as you see signs of fermentation (bubbles, new growth, changing pH), your brew is fine regardless of where the original SCOBY sits.
Mistake 2: Confusing Yeast for Mold: Brown strings, sediment, and cloudy patches are yeast activity. They are signs of health, not contamination. If it is brown and submerged, it is not mold.
Mistake 3: Throwing Away Early Formation: Those first white patches on day three might look suspicious, but they are often the beginning of a new SCOBY. Give it time. If it is mold, it will become obviously fuzzy. If it is healthy SCOBY, it will thicken and solidify.
Mistake 4: Over-Checking: Every time you remove the cover to inspect your brew, you risk contamination. Trust the process. Check visually through the glass daily if you must, but keep the cover on for at least the first seven days.
Mistake 5: Worrying About Health Risks: Many new brewers are terrified of accidentally drinking mold. In reality, moldy kombucha smells terrible and looks obviously wrong. You would not accidentally drink it. Still, if you have any doubt about a batch, throw it out. Peace of mind is worth more than a dollar of tea and sugar.
Frequently Asked Questions
How do you tell the difference between mold and normal SCOBY?
The key difference is texture. Mold is fuzzy, hairy, or dusty with colors like blue, green, black, or white spots. A healthy SCOBY is smooth, gelatinous, wet, and ranges from cream to tan in color. Mold sits on the surface looking dry, while SCOBY integrates with the liquid.
What does a moldy SCOBY look like?
A moldy SCOBY displays fuzzy or hairy growth on the surface, typically in circular spots. Colors include blue, green, black, or white with a dry, dusty texture. The mold sits on top of the liquid or SCOBY rather than integrating with it. Fuzzy texture is the most reliable indicator of contamination.
Why does my kombucha have mold in it?
Mold grows when fermentation conditions allow unwanted fungi to thrive. Common causes include temperatures below 65 degrees Fahrenheit, insufficient starter tea (less than 1 cup per gallon), pH above 4.0, contaminated equipment, or a weak SCOBY. Mold spores exist everywhere but need the right conditions to colonize.
Can a moldy SCOBY be saved?
No. Once mold appears on the surface, the entire batch including the SCOBY and liquid must be discarded. Mold sends microscopic roots (hyphae) throughout the brew that cannot be removed by scooping. Attempting to save a moldy batch risks health issues from mycotoxins.
What happens if you drink moldy kombucha?
Drinking moldy kombucha can cause allergic reactions, respiratory issues, or digestive upset due to mycotoxins produced by mold. Symptoms depend on the mold species and individual sensitivity. If you accidentally consume moldy kombucha and experience symptoms, consult a healthcare provider.
How to prevent mold in kombucha?
Prevent mold by using 1 cup of starter tea per gallon, maintaining 75-85 degree Fahrenheit temperature, covering with tight-weave cloth, sanitizing equipment with vinegar, keeping pH below 4.0, and avoiding disturbance during the first week. Temperature control and adequate starter tea are the most critical factors.
Is my kombucha mold or yeast?
Yeast appears as brown strings, sediment, or cloudy patches submerged in the liquid. Mold grows on the surface as fuzzy, colored spots. Yeast is a normal part of fermentation. If the growth is submerged and brown, it is yeast. If it is surface-level, dry, and fuzzy, it is mold.
What is a healthy SCOBY supposed to look like?
A healthy SCOBY ranges from cream to tan or light brown in color. It has a smooth, gelatinous, rubbery texture and may be lumpy or uneven. Brown yeast strands underneath are normal. The surface should appear wet or shiny, never dry or fuzzy. SCOBYs can sink, float, or sit sideways – position does not indicate health.
Final Thoughts: You Can Do This
After reading this guide, you now have the knowledge to confidently distinguish between kombucha mold and a healthy SCOBY. Remember the golden rule: fuzzy means mold, smooth means SCOBY. When in doubt about a white patch, give it a few days. True mold will become obviously hairy. Healthy new SCOBY will thicken and connect.
Kombucha mold vs healthy SCOBY identification gets easier with experience. Your first few batches will teach you more than any article can. Pay attention to temperature, use plenty of starter tea, and resist the urge to over-check your brew. In three years of brewing, I have encountered mold exactly zero times. With these practices, you will likely have the same experience.
Do not let fear of mold stop you from brewing. The satisfaction of producing your own kombucha far outweighs the small risk of contamination. And now that you know exactly what to look for, you can brew with confidence. Happy fermenting.