
If you have ever opened a jar of dried basil only to find it smelling like dusty cardboard, you already know the frustration of herbs losing their punch. I have been there more times than I care to admit. That is exactly why I started vacuum sealing my dried herbs, and the difference was immediate. My oregano still tastes like oregano a year later instead of fading into nothing after a few months.
Learning how to vacuum-seal dried herbs for long-term pantry storage is one of the most practical skills you can pick up as a home cook, gardener, or anyone who likes to buy herbs in bulk. The process is straightforward, the equipment is affordable, and the payoff is real: herbs that keep their flavor, color, and aroma for years instead of months.
In this guide, I will walk you through the entire process from start to finish. You will learn which containers work best, how to handle different types of herbs, what mistakes to avoid, and how long you can realistically expect your vacuum-sealed herbs to last. Whether you are preserving a summer garden harvest or stocking up on bulk purchases, this guide has you covered.
Table of Contents
Why Vacuum-Seal Dried Herbs?
The short answer: oxygen is the enemy of dried herbs. Every moment your herbs sit exposed to air, oxidation is slowly breaking down the volatile oils that give them flavor, aroma, and potency. Vacuum sealing removes that oxygen, hitting pause on the degradation process.
I noticed the difference within weeks of switching. Herbs I had vacuum-sealed retained their bright green color and strong scent, while the same herbs stored in regular zip-top bags had already started fading. It was not subtle. The vacuum-sealed rosemary was still fragrant and piney; the other batch smelled like faint hay.
Here is what vacuum sealing actually does for your herbs:
- Prevents oxidation by removing oxygen that breaks down essential oils and flavor compounds
- Blocks moisture from reaching the herbs, which prevents mold and clumping
- Preserves color by keeping chlorophyll and other pigments from oxidizing
- Extends shelf life by 2 to 3 times compared to standard airtight storage
- Protects against pantry pests like weevils and moths that chew through thin plastic
Should you vacuum seal dried herbs? If you store herbs for more than a couple of months, the answer is yes. The minimal effort of vacuum sealing pays off every time you reach for a jar and the herbs still smell and taste the way they should.
One thing I want to be clear about: vacuum sealing is not the same as just putting herbs in a container with a tight lid. A regular airtight jar still contains oxygen. Vacuum sealing actively removes that oxygen, which is the key difference. Think of it as going from “okay storage” to “actually protecting your investment.”
Herbs vs. Spices: Does the Difference Matter for Storage?
Before we get into the process, it helps to understand a quick distinction. Herbs come from the leafy parts of plants (basil, thyme, oregano, parsley), while spices come from seeds, bark, roots, or dried fruit (cumin, cinnamon, ginger, peppercorns). This matters for storage because their oil content and density are different.
Leafy herbs are more fragile and lose potency faster because their essential oils are concentrated near the surface. Spices, especially whole seeds and bark, tend to hold their flavor longer because the oils are locked deeper inside the plant material. That means your vacuum-sealed thyme will still degrade faster than your vacuum-sealed whole cumin seeds, even though both benefit enormously from the process.
There is also the question of whole versus ground. Whole herbs and spices last significantly longer than their ground counterparts. A vacuum-sealed whole bay leaf can stay potent for two to three years. Ground bay leaf? You are looking at one to two years at best, even vacuum sealed. If you have the space and the option, store things whole and grind as needed.
How to Vacuum-Seal Dried Herbs for Long-Term Pantry Storage
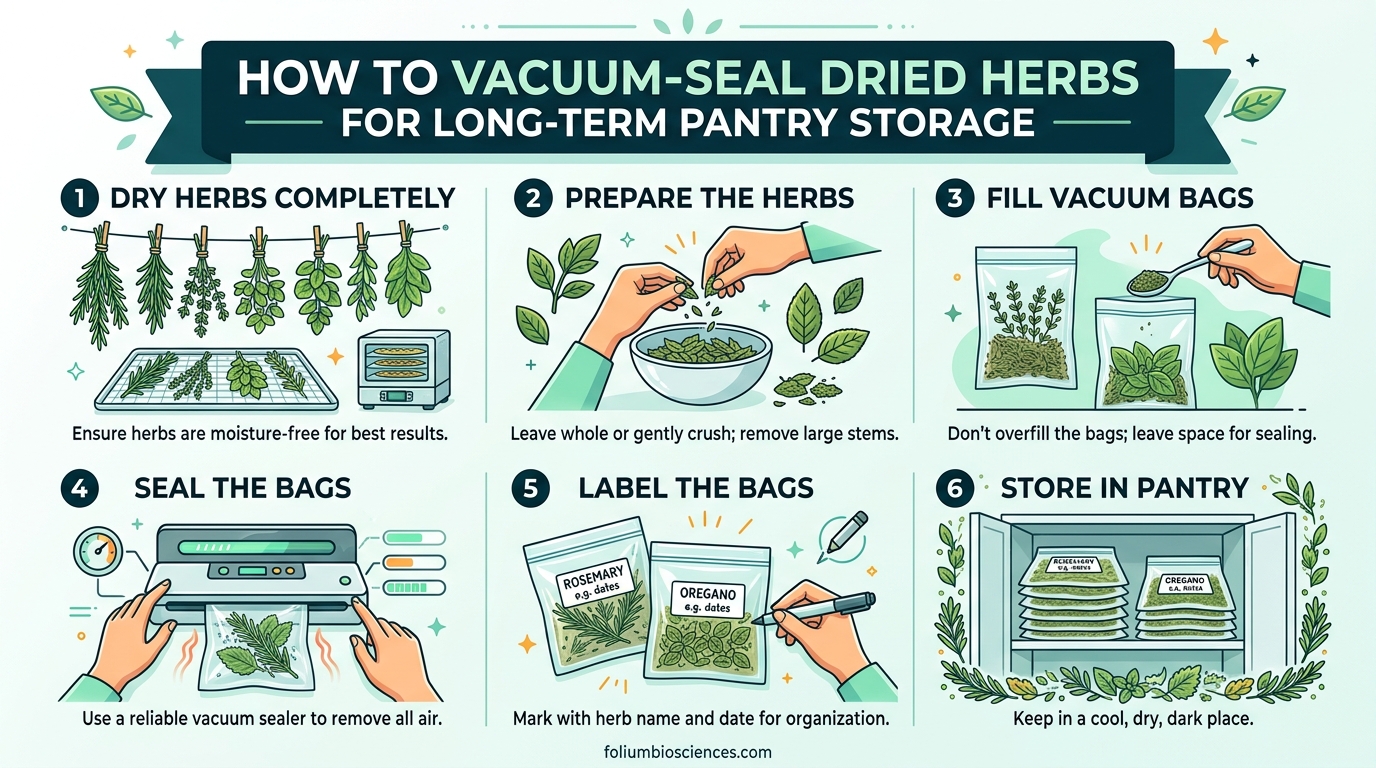
This is the section you came for. I have refined this process over several years of preserving my own garden herbs and bulk purchases, and these steps work reliably every time. Follow them in order and you will have properly sealed herbs in under ten minutes per batch.
Step 1: Make Sure Your Herbs Are Completely Dry
This is the most important step and the one people skip most often. If there is any residual moisture in your herbs, vacuum sealing will trap it inside, and that moisture can lead to mold. Herbs should be brittle enough to crumble when you bend them. If they are pliable or leathery, they need more drying time.
I use a simple test: take a stem and try to snap it. If it snaps cleanly, the herbs are dry enough. If it bends without breaking, spread them out and give them another 24 to 48 hours in a warm, dry spot. A dehydrator set to 95 degrees Fahrenheit works well for finishing herbs that are almost there.
Step 2: Choose Your Container
You have three main options for vacuum sealing dried herbs, and each has its strengths:
Vacuum seal bags (pouch style) are the most common and affordable option. They work well for large batches and are easy to label. Use the wider pouch-style bags rather than narrow rolls, since they give you more flat surface area for thinner herb layers.
Mason jars with a vacuum attachment are my personal favorite for everyday pantry storage. You can see the herbs through the glass, the jars are reusable indefinitely, and the vacuum seal is just as effective. You will need a jar attachment adapter that connects to your vacuum sealer.
Vacuum canisters with valve lids are convenient and look great on a shelf. They tend to be more expensive, but they are easy to open and reseal, which makes them ideal for herbs you use frequently.
Step 3: Prepare and Portion the Herbs
Decide whether you are storing herbs whole or crumbled. I recommend keeping them whole when possible for maximum shelf life. If you do crumble them, leave the pieces fairly large rather than grinding them to a powder.
Portion your herbs into amounts you will realistically use within a few months of opening. There is no point vacuum-sealing a year’s supply in one bag if you will break the seal after two weeks. I typically portion into amounts that last me about two to three months of regular cooking. For small quantities, vacuum-sealed Mason jars work better than bags because you can open and reseal them with the jar attachment.
Important tip for fine powders and crumbled herbs: If you are sealing ground herbs or finely crumbled leaves, place them inside a smaller zip-top bag first, then put that bag inside the vacuum seal bag. This prevents fine particles from being sucked into the vacuum sealer motor, which is a common and frustrating problem. Several people on cooking forums have reported ruining their sealers this way, so this extra step is worth the thirty seconds it takes.
Step 4: Load the Herbs into Your Container
For bags, lay the herbs flat in a single thin layer if possible. This helps the bag seal evenly and makes it easier to stack in your pantry. Leave at least three inches of empty space at the opening of the bag so the sealer has room to work.
For Mason jars, fill the jar to about three-quarters full. Leave headroom so the vacuum attachment can create a proper seal. Wipe the rim of the jar with a clean, dry cloth before sealing to ensure nothing interferes with the gasket.
Step 5: Run the Vacuum Sealer
Place the open end of the bag into your vacuum sealer and close the lid. Press the vacuum and seal button and let the machine do its work. The cycle usually takes 15 to 30 seconds depending on the bag size and how much air needs to be removed. You will hear the motor speed change once the air is out and the seal is being made.
For Mason jars, attach the jar sealer to the top of the lid, connect it to your vacuum sealer hose, and run the machine. You will hear a click when the jar lid seals properly. I like to double-check by pressing down on the center of the lid. If it is firm and does not flex, the seal is good.
Step 6: Label and Date Everything
This step takes one minute and saves you from guesswork later. Use a permanent marker or adhesive label to write the herb name, the date sealed, and the expected expiration date on each bag or jar. I also like to note whether the herbs are whole or ground, since that affects how I use them later.
Do not skip this. I have a drawer of beautifully sealed herbs that I cannot identify because I was in a hurry and thought I would “remember.” I did not remember. Labeling is not optional if you want an organized pantry.
Step 7: Store in a Cool, Dark, Dry Location
Vacuum sealing protects herbs from oxygen, but it does not protect them from heat and light. Store your sealed herbs in a pantry, cabinet, or closet that stays between 50 and 70 degrees Fahrenheit. Avoid spots near the stove, dishwasher, or any window that gets direct sunlight.
A dark pantry shelf is ideal. If you are using Mason jars and can only store them in a spot with some light exposure, consider using amber-tinted jars. The tinted glass blocks UV light that can degrade herbs over time, even through a vacuum seal.
Best Containers for Vacuum Sealing Herbs
Choosing the right container makes a real difference in how well your herbs hold up over time. Here is a closer look at the main options and when to use each one.
Vacuum Seal Bags
These are the go-to for most people starting out. They are inexpensive, available in bulk, and work with any standard vacuum sealer. The main downside is that once you break the seal, you need to reseal the bag (cutting off the sealed portion first) or transfer the herbs to another container. This makes bags better suited for long-term storage where you will not be opening them frequently.
I use bags for herbs I want to store for a year or more without touching. Large batches of garden-dried sage, bulk oregano, and herbes de Provence all go into bags in my pantry.
Mason Jars with Vacuum Attachment
Mason jars are my top recommendation for most home cooks. You can see exactly what is inside, they look neat on a shelf, and they are endlessly reusable. The initial cost of a jar attachment adapter is small (usually around ten to fifteen dollars), and the jars themselves are cheap and durable.
The biggest advantage of jars is the ability to open them, take out what you need, and reseal with the vacuum attachment in seconds. This makes them perfect for herbs you cook with regularly.
Vacuum Canisters
These are rigid containers with a built-in valve that connects to your vacuum sealer hose. They are the most convenient option for daily-use herbs because you can open them, measure out what you need, and re-vacuum-seal in one quick step. The trade-off is cost. They run twenty to forty dollars each, so they are an investment if you have many different herbs to store.
Oxygen Absorbers as a Supplement
Oxygen absorbers are small packets that chemically remove residual oxygen from sealed containers. They are not a replacement for vacuum sealing, but they are a great supplement, especially for long-term storage. I drop a small oxygen absorber into each Mason jar before vacuum sealing. It catches any residual oxygen that the vacuum process might miss, giving you an extra layer of protection.
Use 50cc oxygen absorbers for pint jars and 100cc absorbers for quart jars. You can find them online in bulk packs for just a few dollars.
Shelf Life: How Long Do Vacuum-Sealed Herbs Last?
This is the question everyone asks, and the answer depends on what you are storing and how you process it. Here is what I have found from both my own experience and the collective experience of home preservers and food storage communities.
Whole dried herbs, vacuum sealed: 2 to 3 years. I have used vacuum-sealed whole thyme that was two years old and it was still fragrant and flavorful. Not quite as potent as the day I sealed it, but close enough that the difference was barely noticeable in cooking.
Ground or crumbled herbs, vacuum sealed: 1 to 2 years. Grinding exposes more surface area to whatever residual oxygen might be present, so the degradation happens faster. Still a massive improvement over the 3 to 6 months you get from standard storage.
Whole dried herbs, standard airtight storage: 6 to 12 months. This is your baseline for comparison.
Ground herbs, standard storage: 3 to 6 months. After that, the flavor drops off sharply.
Several factors can extend or shorten these timelines. Herbs stored in a consistently cool, dark, dry environment will last at the longer end of these ranges. Herbs stored in a warm kitchen near the stove or in a humid climate will degrade faster, even vacuum sealed. The vacuum seal is your best defense, but it is not magic. Proper storage conditions still matter.
One more note: vacuum-sealed spices like whole cumin, coriander, and peppercorns can last even longer than herbs, often 3 to 4 years. Their denser structure and lower surface-area-to-volume ratio make them naturally more resistant to degradation.
Storage Tips for Maximum Freshness
Vacuum sealing is the foundation, but a few additional practices will help you get the absolute most from your stored herbs.
Climate-Specific Advice
If you live in a humid climate (regularly above 60 percent relative humidity), moisture is your biggest threat after sealing. Even a tiny amount of humidity that sneaks in when you open a jar can start degrading your herbs. In humid regions, I recommend storing vacuum-sealed herbs in the refrigerator or a temperature-controlled pantry if you have one. The cold slows down any chemical reactions from residual moisture.
In dry climates, you have less to worry about on the moisture front, but temperature swings can still be an issue. Avoid storing herbs in uninsulated garages or sheds where temperatures fluctuate dramatically between day and night.
The FIFO Rotation Method
First In, First Out. When you add a new batch of vacuum-sealed herbs to your pantry, move the older ones to the front so they get used first. This sounds obvious, but it is surprisingly easy to push older jars to the back and forget about them. A simple label with the date makes FIFO easy to follow.
Re-Sealing for Daily Use
For herbs you use frequently, I recommend keeping a small working jar on your counter or spice rack and the bulk of your supply vacuum-sealed in the pantry. When the working jar runs low, open one of your vacuum-sealed jars, refill the working supply, and re-vacuum-seal the bulk jar. This way, you are only exposing a small portion to air at any given time.
If you do not have a vacuum sealer with a jar attachment for re-sealing, transfer the remaining herbs to a small airtight jar and press a piece of plastic wrap directly against the surface of the herbs before closing the lid. This creates an extra barrier that slows oxidation.
How to Tell If Your Herbs Have Gone Bad
Even vacuum-sealed herbs will eventually lose their potency. Here is how to check: open the jar or bag and smell them. If the aroma is weak, dusty, or nonexistent, the herbs have lost their essential oils and will not contribute much flavor to your cooking. Visually, herbs that have gone bad may appear faded, brownish, or discolored compared to their original color.
If you see any signs of mold (fuzzy spots, unusual discoloration, or a musty smell), discard the entire batch. Mold means moisture got in at some point, and it is not safe to salvage any part of it.
Common Mistakes to Avoid When Vacuum Sealing Herbs
I have made most of these mistakes myself, so I am speaking from experience. Here are the top errors that can ruin your vacuum-sealing efforts.
Sealing herbs that are not fully dry. This is the number one mistake. Even slightly damp herbs will develop mold inside the sealed container because the moisture has nowhere to go. Always do the snap test before sealing.
Overfilling bags or jars. Leaving inadequate headroom means the vacuum sealer cannot create a proper seal. Leave three inches on bags and fill jars only three-quarters full.
Letting fine powder get sucked into the machine. If you are sealing ground herbs or finely crumbled leaves, the vacuum can pull particles right into the motor. Use the double-bag trick I described earlier: put the herbs in a small zip-top bag, then seal that inside the vacuum bag. This has saved my sealer more than once.
Storing sealed herbs in sunlight or near heat. A vacuum seal does not block UV light or heat. Herbs stored on a sunny windowsill or next to the stove will degrade just as fast as unsealed herbs in the same spot. Always choose a cool, dark location.
Forgetting to label. I covered this in the steps, but it is worth repeating. A pantry full of identical sealed bags you cannot identify is frustrating and wasteful. Label every single one.
Not using oxygen absorbers for very long storage. For storage beyond two years, adding an oxygen absorber gives you an extra safety net. The vacuum removes most of the air, but the absorber catches what is left.
How to Vacuum-Seal Herbs Without a Machine
Not everyone has a vacuum sealer, and that should not stop you from getting better storage results. There are two methods that work well without any special equipment.
The Water Displacement Method
This works with freezer-safe zip-top bags. Put your dried herbs in the bag and seal it almost all the way, leaving a one-inch gap at the top. Slowly lower the bag into a pot or bowl of water, starting from the bottom. The water pressure forces the air out through the gap. Just before the gap reaches the water line, pinch it shut and zip the bag closed. This removes most of the air and creates a tight seal. It is not as thorough as a vacuum sealer, but it is a big improvement over just pressing the air out by hand.
Manual Pump with Jar Attachment
You can buy a handheld manual vacuum pump with a Mason jar attachment for around fifteen to twenty dollars. It does not require electricity and does a surprisingly good job of removing air from jars. Pump until you feel resistance and the lid is firmly sealed. This is an affordable entry point if you want the benefits of vacuum-sealed jar storage without investing in a full vacuum sealer.
Oxygen Absorbers in Airtight Containers
As a last resort, you can simply put your dried herbs in an airtight container with an oxygen absorber and close the lid tightly. The absorber will pull the oxygen out of the headspace over the next 24 hours. This is not truly vacuum sealing, but it achieves a similar result: dramatically reduced oxygen inside the container. Combined with a good airtight jar, this method can extend shelf life to 1 to 2 years for whole herbs.
FAQ
How long will vacuum sealed dried herbs last?
Vacuum-sealed whole dried herbs last 2 to 3 years when stored in a cool, dark, dry location. Ground or crumbled herbs last 1 to 2 years vacuum sealed. Compare that to 6 to 12 months for whole herbs and 3 to 6 months for ground herbs in standard airtight storage. Adding an oxygen absorber inside the container can help push toward the longer end of those ranges.
How to store dried herbs for a long time?
The best method for long-term herb storage is vacuum sealing in Mason jars or vacuum bags, then storing in a cool, dark, dry pantry. Keep herbs whole rather than ground whenever possible, add an oxygen absorber for storage beyond two years, label everything with the date, and use a FIFO rotation system so older batches get used first. Avoid storing near heat sources or in direct sunlight.
Should you vacuum seal dried herbs?
Yes, vacuum sealing is one of the most effective ways to preserve dried herbs. It removes oxygen, which is the primary cause of flavor and potency loss in stored herbs. Vacuum sealing extends shelf life by 2 to 3 times compared to regular airtight storage and helps herbs retain their color, aroma, and flavor. It is especially worthwhile if you buy herbs in bulk, preserve garden harvests, or want to build a long-term pantry.
Will vacuum sealing spices make them last longer?
Yes. Vacuum sealing extends the shelf life of spices just as it does for herbs. Whole spices like cumin seeds, coriander, and peppercorns can last 3 to 4 years vacuum sealed. Ground spices last 1 to 2 years. The same principles apply: remove oxygen, store in a cool dark place, and keep whole rather than ground when possible.
Can you vacuum seal dried herbs without a machine?
Yes. You can use the water displacement method with freezer-safe zip-top bags: slowly lower the sealed bag into water to force air out, then close the bag just before the opening touches the water. Another option is a manual vacuum pump with a Mason jar attachment, which costs around fifteen to twenty dollars. You can also place herbs in an airtight container with an oxygen absorber for similar results.
Final Thoughts on Vacuum Sealing Dried Herbs
Knowing how to vacuum-seal dried herbs for long-term pantry storage is a skill that pays for itself quickly. The herbs you seal today will still be delivering real flavor months or even years from now, instead of turning into faintly scented dust in your spice cabinet. The process takes minutes per batch, the supplies are affordable, and the results speak for themselves every time you cook.
Start with whatever you have on hand. If you own a vacuum sealer, grab some bags or Mason jars and seal your most-used herbs this afternoon. If you do not have a machine, try the water displacement method or pick up a manual pump. The important thing is to start protecting those herbs from oxygen, moisture, and light before they lose another month of potency sitting on your shelf.
Your future self will thank you the next time you open a jar of vacuum-sealed oregano and it actually smells like oregano.